nxqddb provides the ability for you to customize the look and feel of any expandable field's view dialog box. There are reasonable defaults for all expandable fields; so, you may never need to customize these view dialog boxes. However, if for some reason you have a need to change a particular view box, nxqddb provides a friendly and powerful interface to accomplish your customizations.
You can also customize the search results dialog box. User's find that they customize the search results dialog box more frequently than they do a view dialog box. The techniques to customizing both the view dialog box and the search results dialog box are exactly the same. The only difference between the two is how the configuration is displayed:
You should see a window similar to the one shown in figure 4.5 if you chose to configure the Address view dialog box. And, you should see a window similar to the one shown in figure 4.6 if you clicked the Configure Search Results within the people window. Notice how these two windows are identical except for the contents of the listboxes. Hence, once you learn this one window, you've mastered the technique for configure both the view dialog box and the search results dialog box.
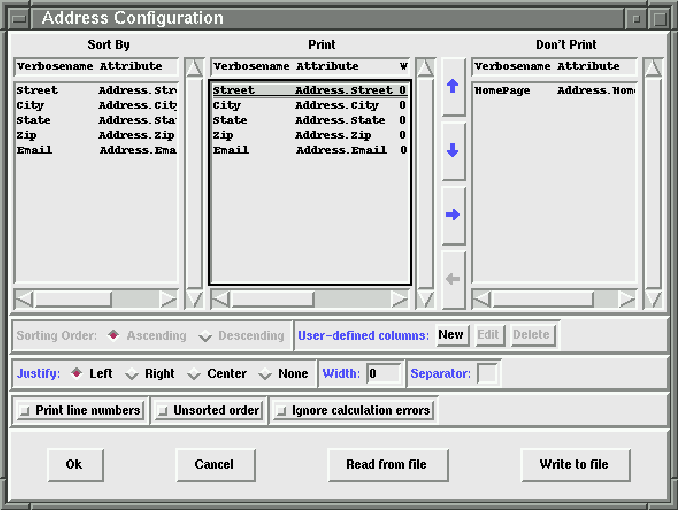
Figure 4.5: Configure view dialog box
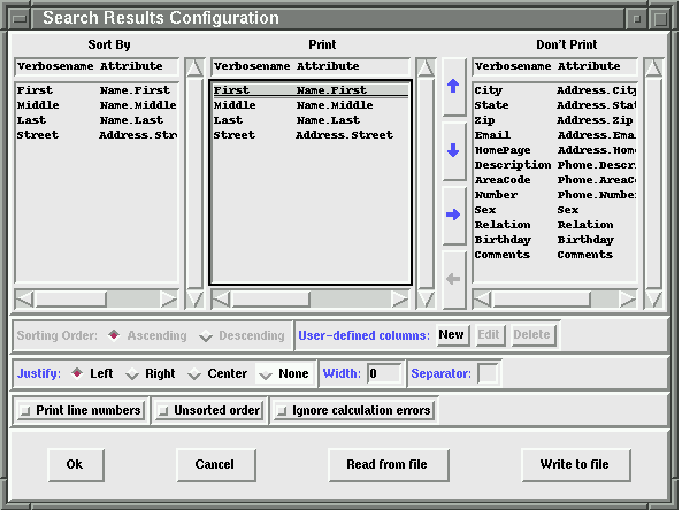
Figure 4.6: Configure search results dialog box
From this configuration window, you can specify the following:
You can specify the sort order of the fields displayed in the view box. To rearrange the sort order, click the field that you want to be sorted first. The field will become highlighted.
![]()
Figure 4.7: Configure view dialog box arrows
Now, simply click on the blue arrows to position the field at the top of the list box.
 Blue arrows are active; grey arrows are inactive. To make an arrow
active, you must first select a row from the appropriate listboxes.
To make the up and down arrows active(or blue), choose a row from
the Sort by listbox. To make the left and right arrows
active, choose a row from the Print and Don't Print
listboxes, respectively.
Blue arrows are active; grey arrows are inactive. To make an arrow
active, you must first select a row from the appropriate listboxes.
To make the up and down arrows active(or blue), choose a row from
the Sort by listbox. To make the left and right arrows
active, choose a row from the Print and Don't Print
listboxes, respectively.
nxqddb sorts the rows in the view dialog box based on the position of the field in the list box. For example, in figure 4.8, nxqddb will first sort on Date Due, then Code, Description, Number of reminders sent and finally Last Done.
![]()
Figure 4.8: Ascending or Descending sort order
Each field can be sorted in either ascending or descending order. By default, a field will be sorted in ascending order. To toggle to ascending or descending, click the appropriate radiobutton as shown in figure 4.8.
You can specify what fields you want to display in the view box; the display fields are those fields that are listed in the Print listbox.
To display a field in the view dialog box, do the following:
To remove a field from being displayed in the view dialog box, do the following:
You can choose the width of each field. A zero width informs nxqddb to make the column width large enough to display the widest field value. Zero is the default width; however, you can change this width by entering a number in the width entry (see figure 4.9).
![]()
Figure 4.9: Column Justification
The Justify radiobuttons allow you to justify the values in each column to be aligned on the left or right column margin. For example, for currency fields such as balance, you would likely choose right justification. Most other fields would likely be left justified. For this reason, the default is for fields to be left justified. To specify a field justification:
By default, nxqddb separates the columns in the view dialog box with a blank space. By using a space character, the view dialog box columns are easier to read. However, if for some reason you would like to choose a different separator, follow these simple steps:
You can store your expandable field view dialog configuration(s) to files. Storing configuration files is useful if you change your view dialog box setup frequently.
 For example, suppose you have setup a database for managing
your pet information.
Perhaps you have 2 ways that you like to view a person's pets. Maybe
the first way is to view the Animal Number and Pet Name sorted
by the Animal Number. And, the second way is to view the Pet Name,
Species and Rabies Tag Number sorted by Tag Number.
Each of these two views have different columns and a different sorting
order. Rather
than setting up a new configuration each time you swap between these
two different
views, you can store both configurations to a file and read the desired
configuration when you need it.
For example, suppose you have setup a database for managing
your pet information.
Perhaps you have 2 ways that you like to view a person's pets. Maybe
the first way is to view the Animal Number and Pet Name sorted
by the Animal Number. And, the second way is to view the Pet Name,
Species and Rabies Tag Number sorted by Tag Number.
Each of these two views have different columns and a different sorting
order. Rather
than setting up a new configuration each time you swap between these
two different
views, you can store both configurations to a file and read the desired
configuration when you need it.
To store a view dialog configuration, click the Write to File button.
![]()
Figure 4.10: Read/Write buttons
The standard File Save dialog box will appear as shown in figure 4.11. This window allows you to type a new filename to store the configuration. Or, you can choose an existing configuration file to replace with the new configuration.
The three button operations from this window are:
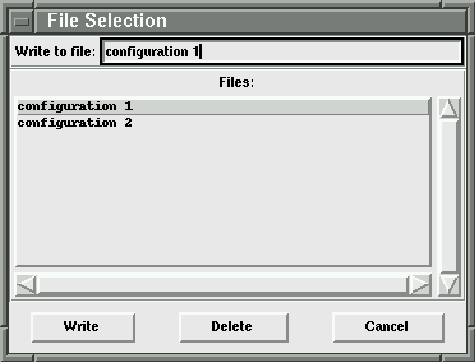
Figure 4.11: Writing a view dialog box configuration file
To read a previously saved configuration, you click the Read from File button. The standard Read from File dialog (see figure 4.12) will be displayed.
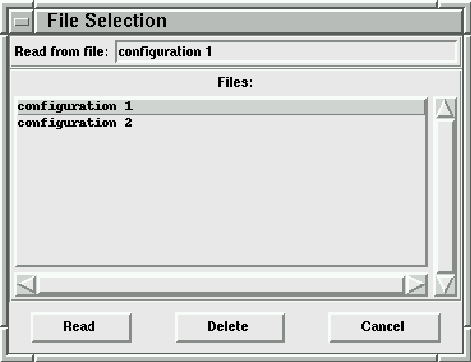
Figure 4.12: Reading a previously saved configuration file
From this window, you can select from a list of previously stored configurations. Unlike, the write operation, you must select a configuration file from the listbox. After you've made a selection you click the Select button to retrieve this configuration.
The three button operations from this window are: