

Next: 8.7 Generating the Acme
Up: 8 Graphs
Previous: Printing options
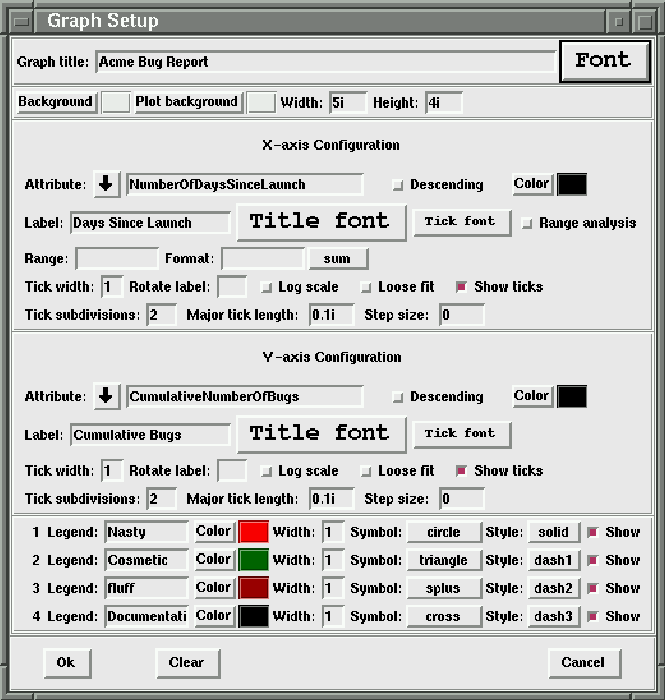
Click the ``Graph'' button in the Setup panel to display
the ``Graph setup'' window shown in figure 8.2.

Figure 8.2: Window to setup your Acme graphs
There are many options that you can configure for your graphs.
Each of these options is briefly described below:
- Graph title
- Sets the title of the graph. The title appears centered above
the graph.
- Graph title font
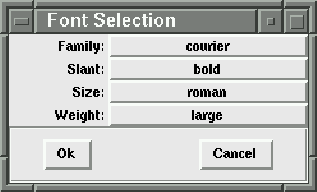
- Clicking the ``Font'' pushbutton to the right of the ``Graph title''
entry box displays a dialog box(see figure 8.3)

Figure 8.3: Font dialog box for graphs/barchart settings
to allow you to choose the font for the graph title. From this dialog,
you choose (1) Family, (2) Slant, (3) Size and (4) Weight by
clicking the pull-down menu adjacent to the setting labels. To activate
your new font, choose the ``Ok'' button. To cancel your modifications,
choose the ``Cancel'' button.
- Background
- Sets the background color of the graph, including
the margins and legend but not the plotting area.
- Plot background
- Sets the background color of your plotting area.
- Graph width
- Sets the requested width of the graph window. For example,
a value of ``4i'' sets the width of the window to four inches.
- Graph height
- Sets the requested height of the graph window
- Attribute
- Use the drop-down listbox to choose the attribute that you
want to plot. In our Acme scenario, we chose ``NumberOfDaysSinceLaunch''
for the X-axis attribute and ``CumulativeNumberOfBugs'' for the
Y-axis attribute.
- Descending
- Checkbutton to denote whether or not the values along
the axis are monotonically increasing or decreasing. If you want
the values to increase, do not check the ``Descending'' checkbutton.
By default, the ``Descending'' option is not turned on.
- Color
- Sets the color of the axis components(label, ticks, etc).
- Label
- Sets the title of the axis. By default, nxqddb populates this value
with the attribute name that you've chosen for the Axis. However,
you have the ability to modify this value if you so desire.
- Title font
- Sets the font of the title using the standard font selection dialog
box(see 8.3).
- Tick font
- Sets the font of the axis ticks using the standard font selection dialog
box(see 8.3).
- Range Analysis
- This checkbutton turns on/off range analysis. If turned on, then nxqddb
will perform the range analysis based on the settings you choose. If turned off, then
nxqddb will ignore your settings and exclude range analysis.
- Range
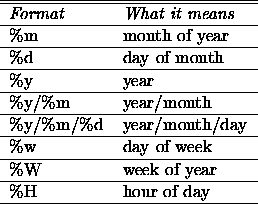
- Dates and strings can be used on the X-axis
for performing range comparisons. Dates can be displayed
in any format that strftime can handle. You can also
choose to specify ranges for summaries; some examples
are listed in table 8.3

Table 8.3: Sample range values
Dates are processed with the range
specification, and like values are lumped together
for sum, avg, stddev, min, max, count, or prod
operations on the Y values. The X-axis is sorted by
ASCII comparison. Some examples of aestheticly
pleasing range/format pairs are illustrated in
table 8.4.

Table 8.4: Aestheticly pleasing range values
- Format
- Tell nxqddb how you want your data formatted.
- Range analysis Drop-down options
- Choose the type of range operation from
the pulldown menu shown in figure 8.4.

Figure 8.4: Range operation pull-down menu
- Tick width
- Sets the width of the axis and tick lines. nxqddb defaults
this value to one(1).
- Rotate label
- You can specify the degrees to rotate the axis labels.
- Log scale
- If turned on, the scale of the axis is logarithmic. If turned off,
the scale is linear. The default scale is linear.
- Loose fit
- If turned on, nxqddb makes the limits of the axis loose fitting at
the outer tick intervals. The default nxqddb loose fit option is turned off.
- Show ticks
- If turned on, nxqddb will display minor ticks. If turned off,
minor ticks will not be displayed. The default is to show ticks.
- Tick subdivisions
- Indicates the number of minor axis ticks that are displayed.
If number is two, only one minor tick is displayed. If number is one,
then no minor ticks are displayed. nxqddb defaults this option to two.
- Major tick length
- Sets the length of major ticks. If the value is negative,
the axis will be inverted with ticks drawn pointing towards the plot. nxqddb
defaults this option to 0.1i
- Step size
- Sets the step size between the major axis ticks.
You must enter a value greater than zero and
less than the axis range or your entry
will be ignored and the step size is automatically
calculated based on the element data points.
In our Acme graph scenario, we created four separate search criteria. Hence,
on the ``Graph Setup'' window, we'll see our four graphs. We can configure
each of these graphs separately by setting the following options:
- Legend
- Enter the text to appear as the legend. In our example, we
entered (1) nasty, (2) cosmetic, (3) fluff and (4) documentation as
our 4 legends.
- Color
- Clicking the ``Color'' button displays a window for you to specify
a color for the graph
- Width
- Sets the line width.
- Symbol
- Drop down list of symbols to choose from including: none, circle,
cross, diamond, plus, etc.
- Style
- Sets the style of line connecting the plotted points. The style
may be one of solid line or dash style lines chosen from the drop-down
choice box.
- Show
- Checkbutton that when turned on displays the legend.
If turned off, then the legend will not be shown.


Next: 8.7 Generating the Acme
Up: 8 Graphs
Previous: Printing options
Herrin Software Development, Inc.


