

Next: 8.8 Applying customizations to
Up: 8 Graphs
Previous: 8.6 Setting up your
After you've completed the graph setup, click the ``Run report'' button
on the ``Reports'' window. nxqddb will redisplay the ``Graph Setup'' window
to allow you to make any changes to the graph setup before
generating the graph. Click the Ok button to continue
generating the graph. nxqddb will then display
the standard print dialog box to prompt you for the

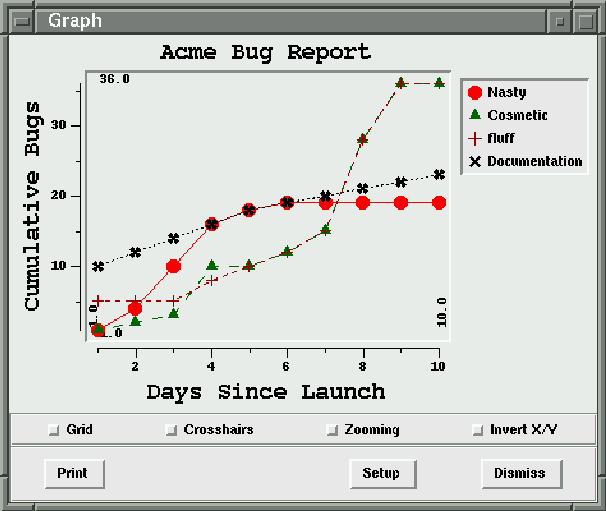
Figure 8.5: Acme graph of software bugs
print destination. Choose ``Preview on screen''; you should
see a window similar to the one shown in figure 8.5.
On the graph window shown in figure 8.5, notice
that nxqddb provides three checkbuttons:
- Grid
- This checkbutton turns on/off a grid.
- Cross-hairs
- This checkbutton turns on/off cross-hairs.
If turned on, you'll see an intersecting vertical and horizontal
line. This option is useful to locate the X and Y values for
a point on the graph.
- Zooming
- This checkbutton turns on/off zooming. To zoom in on a
part of your graph, follow these steps:
- Check the ``Zooming'' checkbutton. The checkbutton is
turned on when the red checkbutton square is depressed.
- Locate where you want the upper left corner of your
desired zoom area and then click the mouse. Now move
the mouse to the lower right corner -- notice
how a rectangle follows your mouse movement highlighting
your area. Click the mouse a second time. At this
point, nxqddb will zoom on the area you selected.
You can continue zooming in on your graph.
To return back to the original, just click the ``Zooming''
checkbutton.
- Invert X/Y
- This checkbutton toggles which attribute is on the X/Y axis.
Once you've displayed the graph shown in figure 8.5
you have the option to (1) make further customizations using
the ``Apply'' button or (2) print the graph.


Next: 8.8 Applying customizations to
Up: 8 Graphs
Previous: 8.6 Setting up your
Herrin Software Development, Inc.

